Monday, May 9, 2016

Fake Celadon Cone 10 Reduction


Bates Clear Fake Celadon 
Cone 10 Reduction
Minspar - 35
Silica - 21
Gerstley Borate - 7
Barium Carb - 8
Whiting - 8
EPK - 10
Bentonite - 2
Mason Stain 6003 Crimson - 10


You might be saying, why would you go to the effort of making fake celadon at cone 10 in reduction - why not just use a real one. Well first, I stumbled on this beautiful mint green glaze by accident. Secondly, many celadons settle and hard pan horribly due to the heavy materials in them. This glaze however is a nice clear that takes to mason stains very well (and even works at cone 6!) Although this crimson burns out, many other stains look great in this base. It works best on porcelain bodies, as most clears do, and will reformulation to not crazy on stoneware bodies.


Tuesday, August 4, 2015

Line Blend Glaze Testing

     In glaze testing, sometimes finding a color or glaze surface you like can be a challenge. Line Blending, with all its variables, can assist in making it less so. Line Blending is basically a way to gradually change variables in a glaze recipe. The most simple line blend is a Single Variable Line Blend:


     In a Single Variable Line Blend you increase the percentage of something in addition to the 100% recipe. This makes Single Variable Line Blends incredibly helpful in finding the right amount of colorant or opacifier you'd like in a glaze. The numbers at the top of each figure is the number of each tile. For this type of line blend, A represents a base glaze and B represents an additive. Taking a clear glaze and adding percentages of Red Iron Oxide, for example, could take you from a celadon to an amber to a Tenmoku (However I'd increase the percentages by .5% instead of 1%). The percentages show above are just listen to illustrate the idea, but you can change the increments between each tile by any amount. 
     The easiest way I've found to do this type of line blend, rather than mix up seven separate glaze slops, is to mix a 500 gram batch of the base and dip tile 1, then add 1% of the additive and dip tile 2, add another 1% of the additive and dip tile 3, and so on until finished. Obviously, this is not exact because you take away some of the base with each dip, but its close enough to get you in the right area for the color you're looking for.


     The next form of Line blend is a Double Variable Line Blend. This line blend is good for mixing two additives (Copper Carbonate and Tin Oxide for example) to find the right mix of both. This type of line blend, as well as all of the following line blends are completed using a much different process than a Single Variable Line Blend. For this, and all of the following blends, you mix up a glaze slop of the base for each letter. Then in each glaze slop you add whatever you'd like to be blending. The more tiles you will be dipping the larger of a glaze batch you'll need to make. 
     For example, you could have two 500 gram batches of:

Custer Feldspar - 34
EPK - 33
Whiting - 33

    In one batch you add 5% Red Iron Oxide (which would be 25 grams) and in the other you add 10% Titanium Dioxide (which would be 50 grams). Then you use a spoon to take the proportion of each batch into the mix - Tile 5 for example would be two spoonfuls of batch A and four spoonfuls of batch B. This is demonstrated in the image below. Thoroughly stir the mix and dip your tile.
  

   To calculate the recipe of a single tile, follow the image below.


     The following types of line blending are all complete the same way as Double Variable Line blends, however they require increased amounts of glaze slops (Biaxial and Triaxial require three, and hexaxial requires six).


     The Hexaxial Line Blend is a beast of my making. If you're looking for a specific glaze base you can put one material on each corner and blend them to find 37 different bases. Most of them might not work, but this allows you to see lots of different bases all at once. It also works just like any other line blend and you can have one base with 6 different additives.
     The reason the tiles skip numbers unlike the previous line blends is that it would require an enormous amount of tiles to make it have smaller increments, but line blending is a general experiment anyway. As you do line blends and become more particular with what you're looking for you can hone in on the area of a line blend you like the most.

     If you have questions please feel free to ask, and if you have tested any of these (especially the Hexaxial) and would like to share please do!

Thursday, August 28, 2014

Material Information: Wollastonite

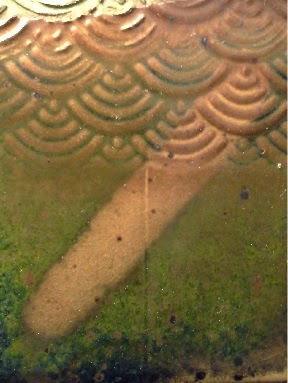
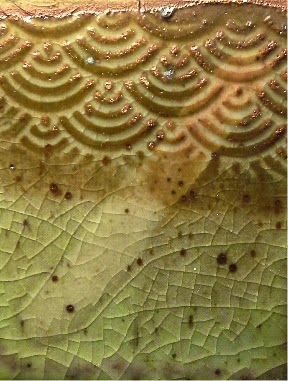
The acicular nature of Wollastonite's crystals

50/50 Base
Neph Sye - 50
Wollastonite - 50
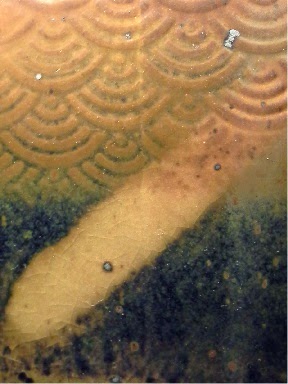
50/50 Base + Copper
Neph Sye - 50
Wollastonite - 50
---------------------
Copper Carb - 2% 
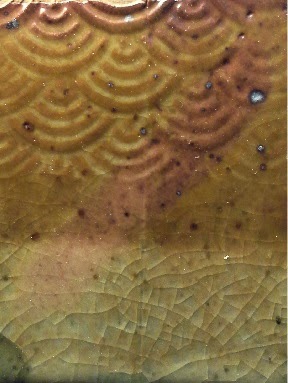
Shorn Base + Copper
Wollastonite - 25
Spodumene - 25
Cornwall Stone - 25
Talc - 25

---------------------
Copper Carb - 4%
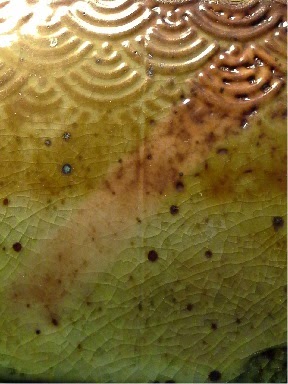
Shorn Base + Cobalt
Wollastonite - 25
Spodumene - 25
Cornwall Stone - 25
Talc - 25

---------------------
Cobalt Carb - 2%
Copper Carb - 1%
     Wollastonite is a natural mineral made of Silica and Calcium (CaSiO3) that is acicular - meaning that the crystals that make up Wollastonite are needle like (above). Because of this unique structure and chemical makeup there are a few things that Wollastonite can do that are quite interesting:
     1. The crystaline structure of Wollastonite can produce visible crystals in a fired glaze, seen in the Shorn glazes (below right), when the base glaze is low in alumina - the higher alumina will stiffen the glaze melt in such a way that the crystals cannot form
     2. The crystaline structure of Wollastonite holds onto itself allowing the dry material to be lifted fingers down, in the same way that straw can be lifted fingers down
     3. The fibrous form of Wollstonite is a good additive in low fire clay bodies because it promotes low thermal expansion and reduces drying and firing shrinkage
     4. Wollastonite is an excellent source of Calcium - a strong flux - for glazes that does not bubble during the firing due to off gassing whereas Whiting, the other prominent source of CaO, produces bubbles in the glaze from off gassing


Thursday, June 12, 2014

Ilmenite Glazes

Glossy Frog Skin
+ 3 grams Ilmenite
MC 0001
Cornwall Stone - 64
Gerstley Borate - 14
Flint - 7.5
Whiting - 7.5
EPK - 5
Zinc - 2
Rutile - 3
Ilmenite - 2
Satin Base with 5 grams Ilmenite
(no Rutile)
     These are just a few glazes that I used to test the material Ilmenite. It's basically just really dirty Titanium and is generally granular. These three glaze bases show how the Ilmenite can interact with the glaze. From melting entirely to remaining in its granular form the color effects are similar to Rutile's, but seemingly darker (when melted in).

Wednesday, June 11, 2014

Shino Glazes

     Shinos are one of my favorite types of glazes, if not my most favorite. They are incredibly variable and incredibly cheap. There's no need for expensive colorants - let alone any colorants for that matter - to make interesting colors in the glaze. That's not to say that colorant's can't be added, but there really isn't any need. With just various mixes of the basic ingredients that make up a shino (clay and feldspar at the most simplistic level) colors like tan, orange, red, gray, black, and gold can be achieved. And, they don't run so there isn't any worry for your shelves.
     There are a few types of shinos: Traditional, Carbon Trapping, Red, and High Alumina (or white, very similar to traditional but with more alumina). I don't have a personal High Alumina glaze, but these are my Traditional, Red, and Carbon Trap shinos:

Carbon Trap Shino

Neph Sye - 45
Spodumene - 15
OM4 - 15
F-4 Feldspar - 10
Redart - 5
Soda Ash - 18
Traditional Shino

Neph Sye - 70
Fire Clay - 30
Red Shino

Neph Sye - 20
EPK - 20
OM4 - 20
Soda Ash - 20
Spodumene -20

      A common shino idea is that you can mix 70% - 80% of Neph Sye with 20% - 30% of pretty much any clay to get a shino, and that's all my traditional shino is. There's no need to hunt down any Fire Clay to make one, just use OM4 or EPK. Really, any clay could work. Even XX Saggar - as seen below.
     I personally am a fan of Carbon Trap Shinos the most, so I experimented more on mine. Additions of various ingredients and substitutions of others have interesting effects.

Carbon Trap + 1% Rutile
Carbon Trap + 3% Rutile
Carbon Trap + 2% Rutile

Carbon Trap with 5 grams
extra Redard added
Carbon Trap with XX Saggar
substituted for OM4
Carbon Trap with Salt
substituted for Soda Ash

     Sodium is what captures the carbon in Carbon Trap shino's giving that nice gray - black speckling. Therefore, just about any high sodium material can be added in an attempt to trap carbon. Using wax resist right after glaze application will prevent sodium build up and show a wonderful effect of different colors in the glaze due to carbon trapping and fluxing. Substitutions like salt work well.
     Now, my Carbon Trap Shino already has a nice metalic lustrous shine, but with additions of Rutile increase that golden shine. Interestingly enough though, from 1, 2, and 3 percent the color changes from brown/gray to blue/black, to gold respectively.

     However, there are some important things to know about shinos:

  • Because they have such high clay content they generally have a higher melting point that other glazes. This means that other glazes should generally be layered on top of them if you layer glazes. That's not to say that some artists have success disregarding this, because some do.  
  • Iron Oxide washes painted on top of a shino will go gun metal and run.
  • The crazed surface in high sodium shinos will bed bacteria just like other crazed surfaces.
  • Shinos are fired in reduction, and the Carbon Trapping shinos like heavy reduction firing.


Saturday, May 3, 2014

A Couple Finished Pieces

A few bowls and a cup glazes in Shorn + Cobalt (Exterior), St. Johns Black (Rim), a just a general white glaze (interior)

The bowl with the scorpion relief. Glazed with Malcom's Red Shino (Exterior) and Al King's Copper Red (Interior)

A higher view of the same Scorpion Bowl

Some small bowls with the same glazes and from the same firing as the Scorpion bowl

Cups, same as above

Saturday, January 25, 2014

Runny Glaze Pot Saucer Idea

3-D Modeling of saucer design 

       Many very pretty glazes, unfortunately, are plagued by a horrible amount of running. Crystalline glazes, Ox Bloods, Chuns, Rutile Blues, and other various types often can run off the pots that they are on. Personally, my Shorn Base and Permafrost Base (if fluxed by a high amount of colorant) run a lot. This gives me good reason to use saucers, like crystalline glaze potters use, under my pots. The average design, however, for these saucers is just a flat shallow bowl which would then easily fuse the piece to the saucer quite often.
        So, I designed a saucer that I believe could catch all of the glaze dripping, be reusable, and easily made from a press mold. That means that i could easily and quickly make new saucers if one does happen to not be reusable after a firing. By setting the pot on a tripod of points, rather than on the surface of the saucer, the liquid glaze can freely drip down. Higher gaps between points would be smart for larger pots.
       There are a few risks that could be possible with this design though: if the kiln is violent (such as wood, soda, or salt) the pot might fall off the saucers or if the pot has an excessively thin base and is very soft at high temperatures it could create dimples on the bottom of the piece.
        These should be made from a hard, porous clay and cover in kiln wash on the top surface including the points and rim. With the kiln wash, removing glaze drips would be easier making these saucers last for more firings. Any glaze left on the saucer would just melt again in the next firing - eventually leading to a glaze overflow.